When programming Ableton DJ mixes, it’s important to be familiar with a number of mix transition techniques.
These transitions are one part of the bigger picture — see our full guide on making a DJ mix in Ableton for how they fit into a complete mix.
For this tutorial we’ll use Ableton Live alongside key detection software. We’re using Mixed In Key, but any software that analyses your files and tags them with a key will do. Before starting, create a folder with your music in it and run it through your key detection software, so every file is tagged with a key and tempo.

There are many different types of DJ mix transition, and some lend themselves more heavily to particular styles of music.
For example, Hip Hop mixing tends to be quite focused on the drop, with little time spent with both tracks playing at the same time. Deep house, on the other hand, tends to rely more on lengthy transitions which match key and tempo.
Regardless of your style or genre, having a number of transition techniques at your disposal sparks creativity and will hopefully set your mix apart from the crowd.
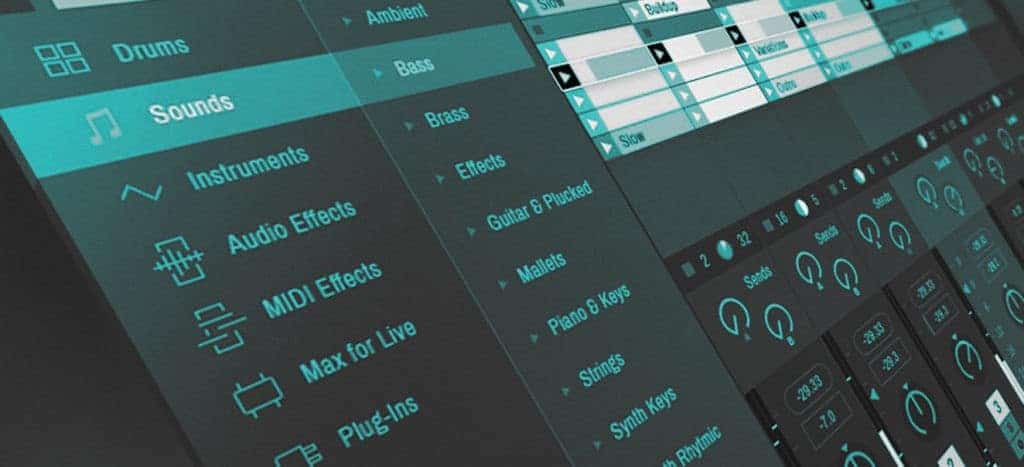
Beat Matching
Since the invention of the manual pitch control on turntables, beatmatching has been the cornerstone of maintaining a continuous, flowing soundtrack for the dancefloor.
The reason Ableton is so popular among electronic music producers is that its primary function is to process audio to manipulate tempo while maintaining pitch. In other words, you can change the tempo while keeping the original key of the track or sample.
In our first example we’ll use two tracks which have an intro and outro comprising just a rhythm section. (These are sometimes called “DJ friendly”.) Take a look at your music folder and select two tracks with a similar tempo and, if possible, an intro or outro consisting of only a beat or rhythm section.
I’m using “Rock It (extended mix)” by Ofenbach and “17 Days (Zach Witness version)” by Prince. The tempo of your tracks should be written in the file name once they’ve been processed by your key detection software. Try to select two tracks no more than 5 BPM apart.
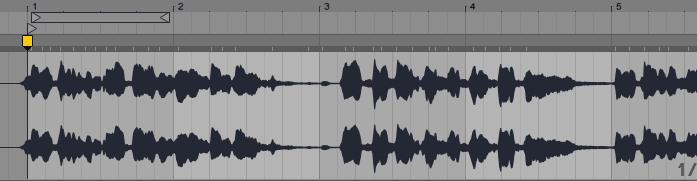
Drag the first track into audio track 1 in Ableton and use the techniques from our guide on warping tracks to make sure it’s warped correctly.
Make sure the track clip starts on bar 1 in Ableton. Hit play and make sure the first beat of the bar starts as you press play. Most music in 4/4 time develops every 32 bars, so the arrangement of the track will change at these points.

Let’s move to bar 32 and see what happens — in the case of this track, the vocals are introduced. Now move towards the end of the track and find where the rhythm-section outro begins. In the Prince track we’re working with, the beat outro begins at bar 137.
Drag your second track from your folder onto the arrange screen so that it starts at bar 137. Hit the “S” button next to the track you’re working on to solo it, repeat the same warping process with this track, then hit “S” again to unsolo it.
If the tracks are warped correctly they should both beatmatch together. If you hear beats clashing, zoom in closer to the warp markers and check for inconsistencies.

The track I’m mixing in is very consistent and only needed a warp marker on bar 9. Next, experiment with the start position of the track you’re mixing in — sometimes bringing it forward by 8 or 16 bars adds more energy to the mix.
Harmonic Ableton DJ Mix Transitions
Mixing in key (or tonal mixing) means matching two tracks of the same or similar key. Our full guide to harmonic mixing goes deeper, but some basic theory and an understanding of your key detection software is enough to get started.
Before we dive in, it’s useful to have a picture of the Camelot Wheel in front of you. Check out our video on mixing in key for some extra tips.
Every track has a key signature, meaning it contains a particular selection of notes. For example, a track in C major contains some or all of the white notes on a keyboard; other keys or scales use a different set of notes.
You may have heard the terms major and minor keys. This just refers to the difference in the relationship between the notes in that type of scale — which gives them a happy or sad sound. That’s about all the theory you need to mix harmonically; the rest is understanding the Camelot Wheel.

When you process your music in key detection software, it assigns a number and letter to each track. The number refers to the key of the song and the letter shows whether it’s in a minor or major scale — for example, a song in the key of A minor is tagged 8A.
If you have a song in A minor (8A) and want to mix out of it harmonically, you have options: choose another 8A track, or step either side to 8B, 9A or 7A. Tracks in 8A give the most perfect harmonic results, and tracks one step away give near-perfect results.
Drag your first track into Ableton, warp it and position it at the beginning of bar one. Listen for a section you’d like to mix out of, then drag your next track into audio channel two below the first.
Solo and warp your second track. Un-solo and play both at the same time. First check the tracks are playing in time — it’s much easier to check for matching keys once the tempos are synced. Once you’re confident both tracks are in time, try positioning the second track in different places to find where the best matches happen.
Want to go deeper? Our DJ courses include over 5 hours of video content
Covering track warping, harmonic mixing, mash-ups, re-edits and mastering.
Ableton DJ Mix Transitions Using Delay and Reverb
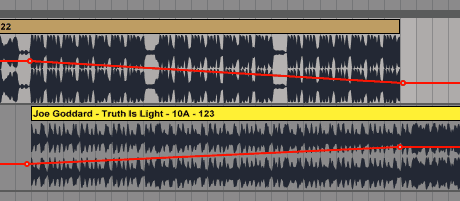
Delay and reverb are audio effects that can be used alongside the other techniques to create a smooth transition. Programming audio effects requires automation — moving or changing something over a time period in your mix. For example, we might increase the level of reverb over a four-bar period.
In Ableton you can automate most of the controls associated with an audio effect. Automation is shown as red lines which we set manually to trigger changes.
In this demonstration we use a track with a vocal section to mix out of, and a second track with an instrumental intro. We’re using “Rollercoaster” by Ivy Sole and “Blinded by the Lights” by The Weeknd. Import your first track, warp it and find a good exit point — in our example we’ve chosen the vocal breakdown towards the end of “Rollercoaster”.
Highlight the audio track, go to “Audio Effects” > “Ping Pong Delay” and double-click to insert it. In the audio channel dropdown, select “Ping Pong Delay” and then “Device On”. A red line appears inside the track — hit the plus symbol to open a separate automation window below.

Double-click on the red line to insert or remove markers. In our demo we’ve created a “Device On” box starting just before and finishing just after where we intend the automation to happen — this keeps things tidy in the arrangement stage. Once you’ve turned on automation for the delay, click the “Wet/Dry” option in the same window.

Insert markers to programme a straight line pointing upwards throughout the intended mix period. Play back the track and experiment with the amount of wet/dry you add, as well as the delay speed on the effect unit itself (button 1 gives a quick delay time compared to 16).
Once you’re happy with the delay settings, import your second track into audio channel 2 and warp it. As with the earlier transitions, play around with its start position to find the best mixing point.
Now add a reverb effect to the first track — highlight audio channel 1 and double-click the reverb unit in the effects section. For our demo we used the “Cathedral” setting. Use the same process as the delay: add a “Device On” channel and a “Wet/Dry” channel, then experiment with the automation levels until you’re happy.
Cutting
Cutting is the art of transitioning cleanly between two tracks. It’s commonly used in Hip Hop but works across genres, and I often combine it with the delay and reverb transitions above. Use your file tags to select two tunes similar in tempo and key.
For the demo I’ve used “Krumm” by Evil Twin and selected a mix-out point towards the end of the track. Import the first track and warp it, then listen through and select a potential mix-out point.
Import your second track, warp it and position it correctly. Look at your bar markers at the top of the arrangement window and line your tracks up in the most user-friendly way possible — the best way is to move the first kick drum of the first track onto a multiple of 8, for example bar 1, 9 or 17.

In our demo the exit point of the first track is at bar 75. Lay the beginning of your second track over the end of the first, then add an empty track between tracks 1 and 2 to give yourself space to edit. Highlight parts you want to remove and delete them so that alternate samples play, creating a chopping effect.
This technique can sound quite clinical, so use the delay and reverb techniques from earlier to glue the sounds together.
Mash-Ups
Mash-ups are two (or more) tracks played over the top of each other to create something new. “2manydjs” brought this style back into the mainstream with “As Heard on Radio Soulwax Pt. 2” in 2002. As well as being released as tracks in their own right, mash-ups are often included in DJ mixes to add a personal, unique touch.
More often than not, an instrumental track is matched with a vocal acapella, and that’s the approach we’ll take. It’s important to find two tracks in the same key. For this demo we’re using “Remain Silent (Ray Mang Instrumental)” by The Handclap Band and “All Stars Get Down (acapella)” by Todd Terry.
If you don’t own any acapellas, you can pull a clean acapella from any track with a stem-separation tool, or source one on Beatport by key and tempo to fit a track in your mix folder.
Drag your instrumental into the arrange page and warp it, then drag your acapella into audio channel 2. Be aware it’s much more difficult to warp a track that doesn’t have a beat. My tip is to listen for the vocal phrases where you think a new 8-bar section would start — this might be the beginning of the verse or the chorus. The lyrics are often repeated throughout the song, so match the warping accordingly.
Once you have the acapella warped, try it over the instrumental and check the timing. You may need to adjust the warping to fit.
We can see the vocal phrasing at the beginning of bars 1 and 5 is very similar, so I’ve positioned the transient markers accordingly. It’s not an exact science, but practising with a number of acapellas will improve your skill here. Also play around with the “Warp From” settings, which you can access by holding “Ctrl” and clicking on the warp markers.
Once you’re confident the acapella is in time, try placing it over different sections of the instrumental to find bits that work well together. If you find a section you want to extend, highlight it on the arrange page (use a spare audio track below the two you’re extending so you don’t accidentally move the audio), press “Edit” and select “Duplicate Time”. You can also use “Delete Time” for parts you don’t want. Now use the earlier transition skills — such as cutting — to bring the mash-up together, and add delay and reverb to give it a different feel.
X-Fade — Using Volume Automation
X-fading is the technique of transitioning between two tracks using a volume fade — as one track reduces in volume, the other increases to create a smooth, balanced transition.
As before, select two tracks of a similar tempo, import them, and warp the first. Identify a point in the first track you’d like to mix out from and click below the track to create a marker. If you need to extend this mix-out point, highlight it and press “Cmd” + “D”.
Then import your second track, warp it, and place it on your initial marker at the beginning of the mix-out point. Open the volume automation for both tracks, insert automation markers by double-clicking on the red lines, and make two lines with the first track fading down and the second fading up.
X-Fade — Using Ableton’s Fade Tool
X-fading with Ableton’s built-in “Fade” tool is a useful technique, and although similar transitions can be achieved with volume automation, I find it often gives quite interesting results.
Import a track into the arrange, warp it and find a mix-out point, then drag the audio back to the mix-out point. Do the same with track 2, but this time drag the audio to the mix-in point — this might be the beginning of the track or the first kick drum.
Now drag track 2 up onto audio channel 1 so it starts where the mix-out point of track 1 finishes, then select fades from the dropdown window below audio 1. Two automation markers will appear at the mix point.

Drag the first automation marker to the right to create an x-fade. Raising or lowering the marker in the middle of the x-fade point changes the volume of the mix. Adjust it to find the best transition point.
Next we’ll apply the x-fade in the other direction, so set the audio back to its previous position. This time we move the second automation marker to the left — but we’re trying to create an x-fade from before the start point of track 2, and there’s no audio to fade in that direction. So we loop the start of the track to give Ableton something to fade: double-click on the audio section in the arrange and set up a loop of 9 bars in the audio window at the bottom of the screen.

Next, drag the second x-fade marker to the left as far as it will go. This will x-fade the first 9 bars of the second track.
Want to learn these techniques step by step? Our DJ courses cover mix transitions in Ableton Live in full.
That’s just about it for our look at Ableton DJ mix transitions. You may also like our post on rotary DJ mixers.